Recent Post
Welcome To My blogging.in, here you will find all the tips,tricks based on technology which we use in our daily life & you can utilize it in your daily life.Do visit my blogs again for more updates,subscribe us by following our Facebook fan page With best regards blogs Admin

Friday, 11 October 2013

How to Send Friend Requests When Blocked

Send Friend Requests When Blocked
Sometimes Facebook block accounts for sending massive friend requests to unknown persons. After getting blocked, you will not be able to send friend requests on Facebook even to people you personally know. Here is a cool trick that will allow you to send friend requests to people even if you are blocked.
Login to Facebook account and get the email address of the person you want to add to as a friend. Then click here and you will be able to add friends by using different email services. Login with any of those email services and add your required contacts to Facebook.
If you want to add bulk friends then create a notepad file with comma separated email contacts and save it as filename.vcf
Finally upload that file through the previous window and your friend request will be sent to Facebook users with those email addresses.


 To boost your click here

You may also like Adding floating facebook,twitter bar


Read more ...

Thursday, 10 October 2013

10 tips to speed up your computer


1.When your system starts, a lot of programs auto load which slow down your machine. Therefore, it is suggested to remove unneeded programs at startup with the help of Microsoft's MSConfig tool. Go to Start > Run > type "msconfig". Go to the startup tab and uncheck the programs you don't want to load whenever the system boots up. Click OK and restart.

2. Your PC comes pre-installed with a lot of programs which you don't even use. They unnecessarily eat up a significant amount of space on your machine and slow your system down. Go to Control Program > Programs and Features > Unintall the programs you don't use.

3. Whenever a program runs on your computer, it leaves certain files on your machine which consume a certain portion of disc space. Over a period of time, hundreds of programs run and thousands of files pile up on your device - which eventually decelerate your machine and sometimes lead to system crash. Therefore, you are suggested to periodically delete temporary files. Go to Start > Run> type "%temp%" > click OK. A folder full of files comes. Select those temporary files and delete. 

4. You are advised to timely update software running on your machine. Most of us tend to click on the "Remind Me Later" button whenever a window pops out suggesting us of any update, and we never bother to go back to update.

 5. A computer is vulnerable to viruses and other types of malicious programs like Spyware and Adware. These malware load into computer memory and slow down its speed. Thus, it is recommended that you install an antivirus on your machine to check for such programs. While there are many antivirus software available for free, we would recommend you Microsoft Security Essential. Also, ensure that the antivirus installed on your machine is not scheduled to run scan during the time of the day when it is heavily used. Schedule it to run scan when you are not using the system. 

6. As your PC runs, files get spread across the device in pieces - framgents. It is recommended that you defragment your disk to bring back separated parts in one place. Defragmenting disk has a noticeable effect on a slow computer. Windows 7 comes with a built-in defragger which automatically defrags at intervals. 

7. By turning off Windows graphics, you can set your computer to deliver a slightly better performance. Go to computer icon on your desktop > Properties > Advanced System settings > Advanced > Click Settings under performance > Enable Adust for best performance. It will have an impact on the speed of your PC.

 8. Users should optimise the browser they use as per their needs. Ensue that your brower does not have unnecessary plugins and add-ons installed which may affect the performance of your device.

 9. Hard drive on your machine must be partitioned. Partioning your hard disk helps in improving the speed of your slow PC. 

10. ReadyBoost in Windows 7 can use your flash memory device to add instant RAM to your PC. Plug in a USB flash drive or card and ReadyBoost is active to use. ReadyBoost is designed to help when your PC's memory is running low. ReadyBoost works with most flash storage devices.


Read more ...

How to install Android on your PC


asus eee pad transformer primeWindows 8’s bold grab for tablet relevance may snatch headlines, but it isn’t the only operating system looking to extend its established supremacy over a whole new class of devices.
Android-x86 project has ported Google’s open-source OS from the ARM processors common in smartphones and tablets over to the x86 chips found in everyday computers, so you can take Android for a spin on your PC before plunking cash down on one of the latest examples of computing convergence. And even if you have no plans to buy an Android PC, playing with Android on your current PC is just plain fun.

Why  virtual machine?

virtual machines aren’t as peppy as physical ones unless you have a bunch of system resources to toss around. And yes, you can install Android on your computer’s hard drive—but I don’t recommend even dual-booting this particular OS.
 
Get VirtualBox up and running
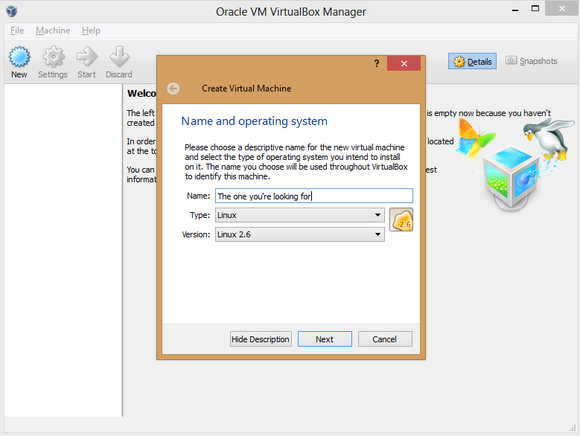
Once you’ve downloaded all the software, open VirtualBox and click the big blue Open button in the toolbar to begin. A Create Virtual Machine window will appear. Name your digital Android PC anything you like, but be sure to select Linux as the type of operating system, and Linux 2.6 as the version. Click Next.
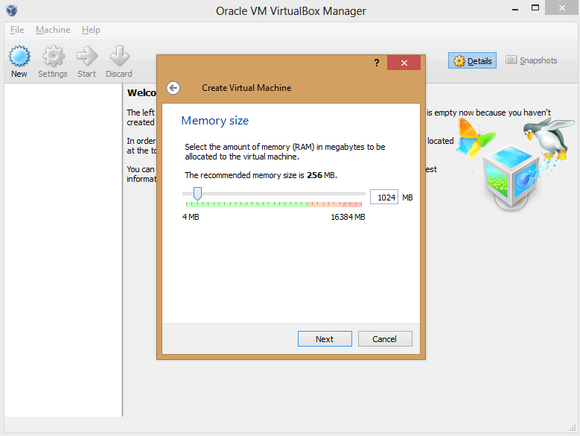
In the option screens that follow, you have to configure your VM’s hardware allocation. Give it at least 512MB of RAM if you can, though Android-x86 can run on 256MB of RAM if you’re using a resource-strapped PC. The more memory you can spare, the smoother the results will be, though you don’t want to allocate so much to Android that your native experience suffers while the VM is active.
Create a virtual hard drive using the default options, adding more storage if you wish. (Remember: Android was made for phones, so it doesn’t take much space, even with multiple apps installed.)
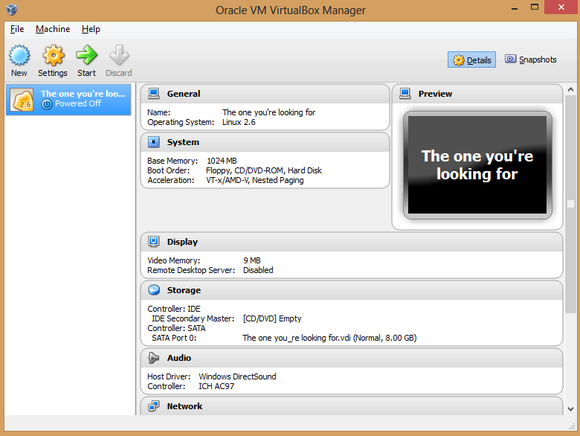
Boom! The VM appears in the VirtualBox manager.
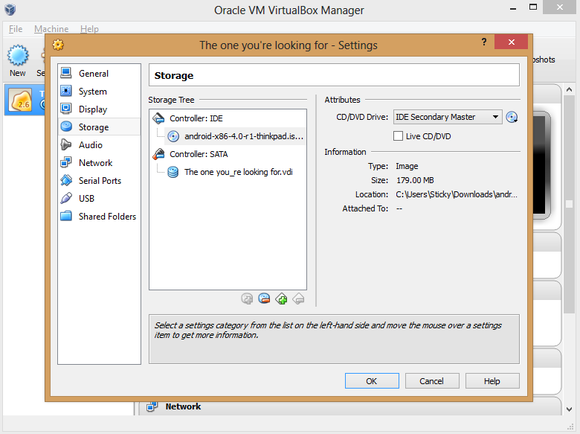
Next, you need to point the VM at your Android-x86 ISO. Click the Storage button in the VM manager and, in the window that appears, select the Empty option underneath ‘Controller: IDE’ to bring up various ‘Attributes’ options to the right. There, click the disc icon to the right of ‘CD/DVD Drive’ and select Choose a virtual CD/DVD disk file from the drop-down menu that appears. Simply browse your hard drive and select the Android-x86 ISO to load it in the virtual machine, and then click OK when you’re done.
You’re not quite finished yet, though. Click the Audio option, and in the window that appears, click the drop-down ‘Audio controller’ box and select ICH AC97. If you leave it on the default Soundblaster 16 setting, your Android VM’s audio won’t work properly.
Got it? Great! Now you’re ready to install Android on your PC. The process is a bit trickier than your standard Windows installation.

Install Android on your PC

Click the name of your Android-x86 VM in VirtualBox’s left pane, and then click the big green Start arrow. After clicking OK on any dialog boxes that pop up—be sure to read them!—you’ll quickly notice that you can’t use your mouse during installation. Use the arrow keys to scroll down to Installation, and then press Enter. Press Enter to select Create/Modify partitions on the next screen as well.
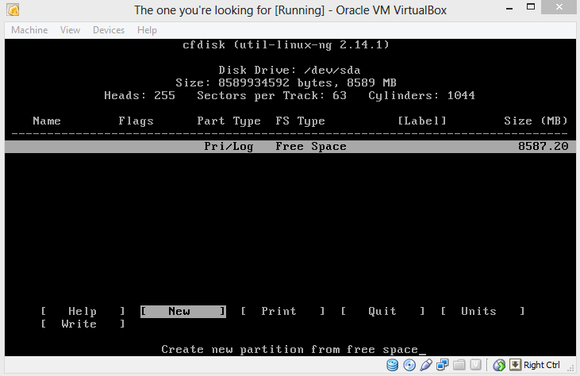
If you usually stick to graphical interfaces, the next menu may throw you for a loop, but it’s nothing to be scared of. Just navigate to New and press Enter again. Select Primary as the partition type, and then press Enter once more to set the partition to the default size. You’ll see the following screen.
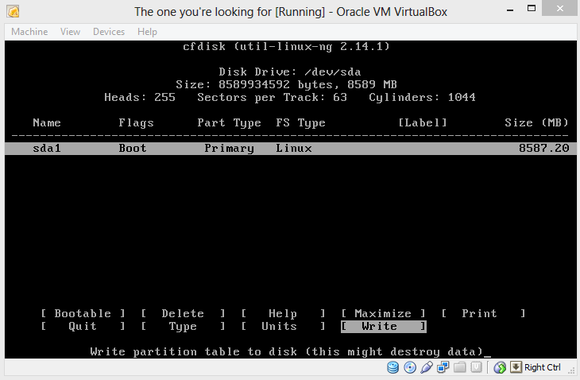
Press Enter on the Bootable option, which should add ‘Boot’ under the ‘Flags’ listing, next to the computer name. With that done, select the Write option. A warning appears, threatening that writing to disk will wipe any data already on the disk. Who cares? This is a virtual machine, you silly installation software. Type yes, and then press Enter yet again.
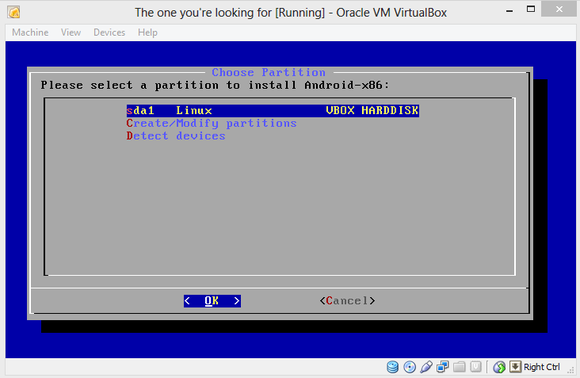
Highlight the Quit option and press Enter to return to the Choose Partition screen, which now lists the ‘sda1’ partition you created on the virtual hard drive. Press Enter again. You’ll see a list of formatting options. Select ext3, press Enter, and select Yes when asked if you really want to format the disk.
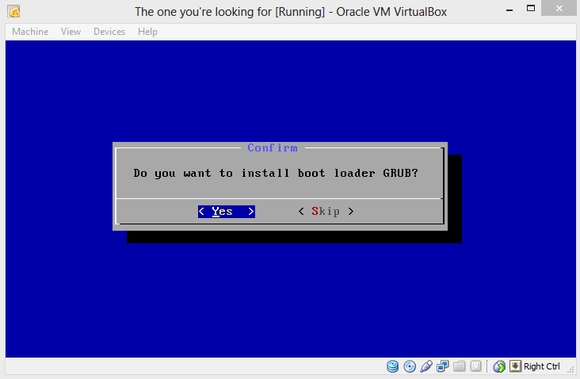
Do you want to install boot loader GRUB? Yup! You also want to install the /system directory as read/write when asked.
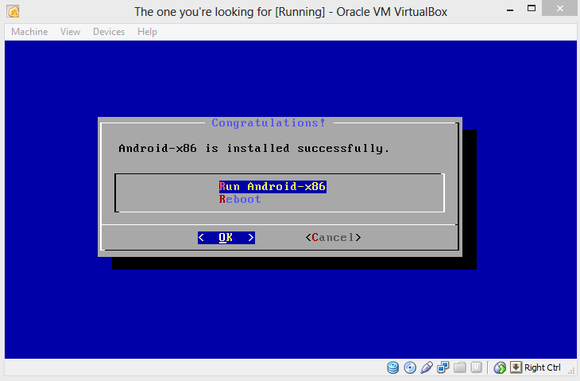
Aaaaand there’s the screen we’ve been waiting for. Run Android-x86.

Assess Android

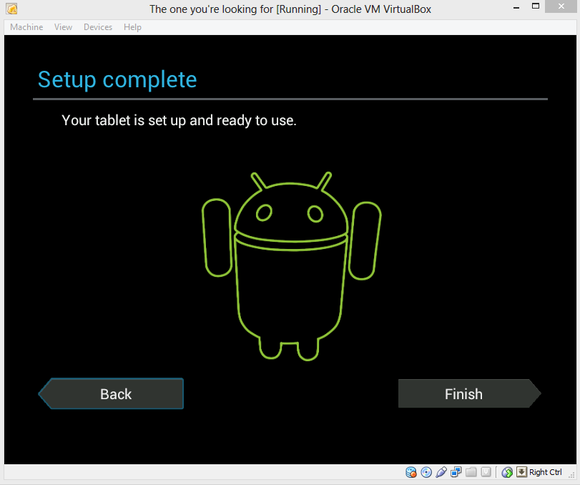
You’re going to set up the operating system the way you would on a new Android phone or tablet. It’s pretty straightforward, and you can even connect the Android-x86 VM to your Google account. But before you do that, you need to coax a mouse cursor on screen, because trying to navigate a touchscreen-optimized OS by keyboard is maddening.
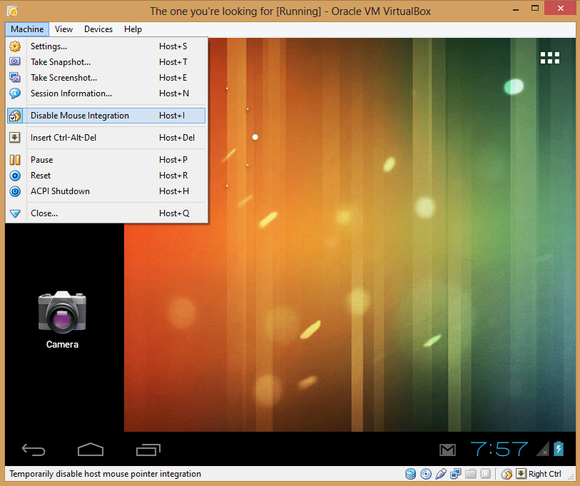
Click Machine in VirtualBox’s toolbar, and select Disable Mouse Integration. Dialog boxes may appear; if so, click through them and continue. Disabling mouse integration allows you to manually control whether your mouse is controlling your primary OS or Android-x86. Pressing the right Ctrl button on your keyboard switches between the two operating systems. To swipe, click and hold the mouse button, and then move the mouse.
With that taken care of, you’re free to explore Android on your PC!


Don’t expect a flawless experience with Android-x86. You can’t sync your Google account’s apps to the VM, despite what the setup process implies—at least not yet. (Fortunately, Android-x86 ships with Google Play installed, and most apps I’ve tried work just fine, though you might notice the occasional wonkiness.) Nor does the virtualized OS work with any of the touchscreen displays I’ve tried. And yes, performance can be kind of poky, no matter how much RAM you toss at Android-x86.
That being said, giving Android a whirl on your PC will nevertheless give you a good feel for what’s possible on an Android-powered laptop. The result isn’t perfect, but if you give it a shot, I think you’ll wind up pleasantly surprised. Android wasn’t made for big screens, but all those smartphone-optimized apps hold up okay, and a ton of them are completely free, completely awesome, and can’t be found on proper PCs.


Enjoy For Tips Tricks click Here


Read more ...

Recent Comment

You may also like this

Our SiteMap

Copyrighted.com Registered & Protected 
7FKO-MLRJ-L5DL-N6XJ

Post Here

Name

Email *

Message *


Receive All Free Updates Via Facebook.